
Creating a Laminated Counter Top

Creating a laminated counter top is not difficult. With basic skills and a few tools, creating a laminated counter top is something which can be done in just a few hours. Done correctly, it will last a life time.
Why create a countertop from laminate? First, the alternatives are solid wood, stone and marble. These are all superior materials, but they are much more costly. Additionally, a lot more care is needed for solid wood.
Building a laminated countertop can be done using the following steps. Please note that one should always read the safety precautions for all of the tools and make sure to wear eye protection.
Step by Step: Building a Simple Counter Top
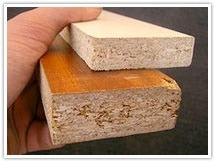 Choose your core materials. Particle board is an easy to use and affordable option. Particle board comes 3/4 inch thin. For a thicker, stronger and sturdier counter, it is recommended to glue and nail two boards together.
You will now have 1.5 inch thick edges. The first thing you want to do with your laminate is cut strips for the front and back edges. When ripping the strip, make sure you cut a bit wider than the 1.5 inch thickness of the counter top to ensure complete coverage.
Brush contact cement, which can be found in any home store, onto both surfaces - the particle board and the laminate. This glue is made to adhere to itself so it is important to make sure that there is no space without glue on both surfaces. Do not place the laminate on the counter yet.
Wait until the contact cement is dry to the touch to set the edge in place. Make sure it is lined up properly before making contact. To ensure a completely flat application, go over the edge with a roller.
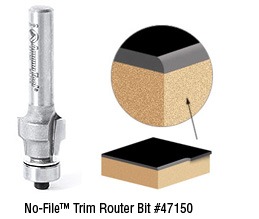
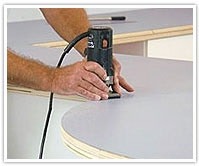 Using a trim router, trim off any excess laminate from both the top and bottom. After the front and back edges are applied, dried, rolled and trimmed, there will be a sharp edge. You can use a belt sander to remove the sharp edge. Alternatively, if you want to skip this stage and not have a sharp and excess edge, you can use No-File™ trim router bits.
Now for the top, cut your laminate to just larger than the size of your top to ensure complete coverage. Apply glue to the under surface of the laminate. Using a roller and/or a brush, move the glue around to cover the complete side. When finished, move all excess glue onto the particle board glue surface. This not only ensures there is no excess glue on the laminate, but it also saves glue. The contact will not stick until both surfaces are dry so take your time, and do not rush the job.
When applying the laminate, there is only one try to set it into the correct position. In order to give some room to play, lay out dowels onto the particle board surface. These act as spacers and will allow you to line up the laminate to the particle board without making direct contact. Additionally, using dowels allows for easy lateral movement.
Make sure the two pieces do not touch. When the laminate is centered, begin to remove the dowels starting from the center. As the dowels come out, apply light pressure with your hands. At this point, the center should be in complete contact.
 When the center is in place, slightly bend up the sides of the laminate and remove all the remaining dowels from each end, pressing down the laminate to the particle board with your hands each time.
When the dowels have all been removed and the laminate is lying flat on the particle board, use a J-roller and apply heavy pressure. Make sure to begin from the center and work outwards.
When the laminate has been applied to the particle board and has been rolled out, it is time to trim the laminate edge. Use a clean file to clean the edge. When filling, file downwards to minimize the risk of chipping the edge.
Again, as mentioned above, one can skip this last finish stage of filing by simply using No-File™ trim router bits.