


Router Bit Technical Information
Choosing and Using Router Bits
Most every woodworker has tried an inexpensive router bit because they were tempted by the low price. As the saying goes, you get what you pay for. It’s important to know that although router bits of different brands may appear the same, the important differences are impossible to see without precise measuring tools and magnification.
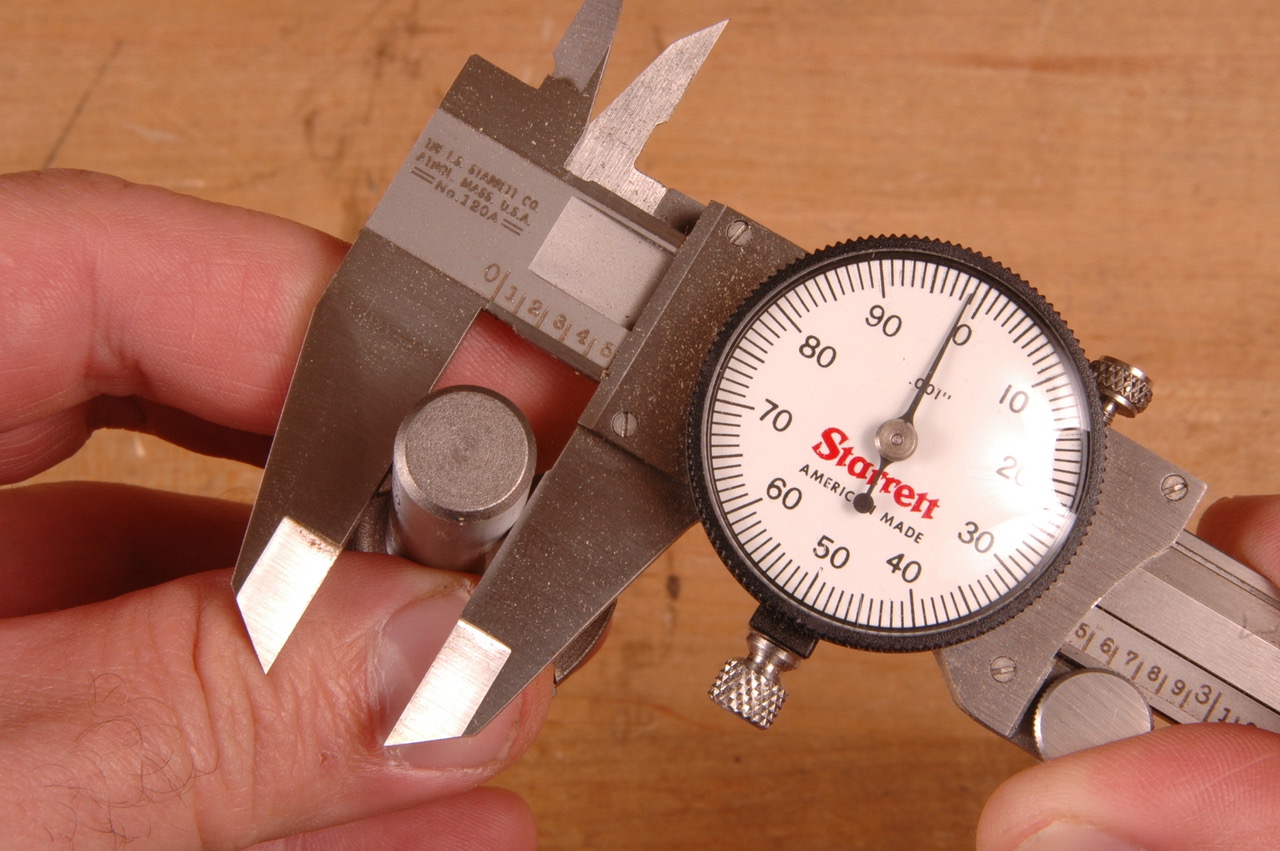
For example, the shank of an inexpensive bit is often undersized from sloppy machining; this can cause the bit to slip in the collet and spoil the workpiece. In contrast, Amana router bits are precisely ground no less than 0.002” under the collet dimension (see below photo). This ensures that the collet can firmly grip the shank of the bit.
Additionally, Amana uses only the finest quality carbide in all of their bits. Inexpensive bits often use coarse carbide grains that will not hold an edge and may even chip during use. Also, the carbide tips on Amana router bits are thicker. This allows the bit to be sharpened many times which greatly extends the life of the tool.
Finally, the quality of Amana’s brazing is second to none. It’s the brazing that secures the carbide to the steel body. During manufacturing, the temperature of the brazing process must be carefully controlled; too cool and adhesion will not occur, too much heat can damage the carbide. Amana Tool uses a highly technical sophisticated brazing process which ensures that you’ll receive the highest quality router bit available.
As you carefully review the pages in this catalog you’ll notice that many bits are too large for use in hand-held routers. As you carefully review the pages on this website you’ll notice that many bits are too large for use in hand-held routers. They are indicated by text in the page description, Use in a table-mounted router. Not for use in a handheld router! Inverting your router and mounting it under a table turns it into a mini wood shaper and enables you to create a wider variety of profiles than ever before.
For example, making cabinet doors with raised panels is something you can make with your router that is possible only when mounted in a table. Click here and take a look at the variety of Amana stile and rail sets.
A router table makes your router safer and cleaner, too, because you can attach a guard and dust collection to the fence.
You don’t need to spend your entire woodworking budget on a router table; in fact, you can make a table of your own.
Choosing a bit size
Notice that many router bits are available in both a 1/4" and 1/2" shank size. Whenever possible it’s best to choose the larger shank size. The 1/2" bit shanks are substantially stronger and less prone to breakage than a smaller shank. In fact, a 1/2" shank has nearly four times the surface area of a 1/4" shank. However, 1/4” shank bits are often ideal for use in small laminate trim type routers when making small cuts, which is why we offer them.
Straight bits and flush cutting bits are available in a variety of lengths. While longer cutting edges are sometimes needed, it’s best to use the shortest length possible to avoid bit deflection and vibration.
Router Bit Types
Flipping through the pages of this catalog may be confusing at first because of the many bit choices. It’s helpful to first understand the type of bit that you need. Router bits are categorized by the type of cut that they make.
Profile bits
These are the bits that allow you to create beautiful custom moldings for furniture, cabinets, and trim work for your home. Decorative ogees, coves, beads and chamfers are but a few of the many profile bits you’ll find in these pages. Many profiles are available in a number of sizes. Mixing and matching the sizes and profiles allows you to create most any molding you can imagine for that special woodworking project.
When choosing a profile bit, remember that the wood profile is opposite of the bit profile. Amana makes it easy to select the correct profile bit by providing an illustration of the wood adjacent to each bit profile. And, to make it even easier, the illustrations are full-scale and are available to be printed out online at www.amanatool.com (limited items currently).
Slotting and Straights
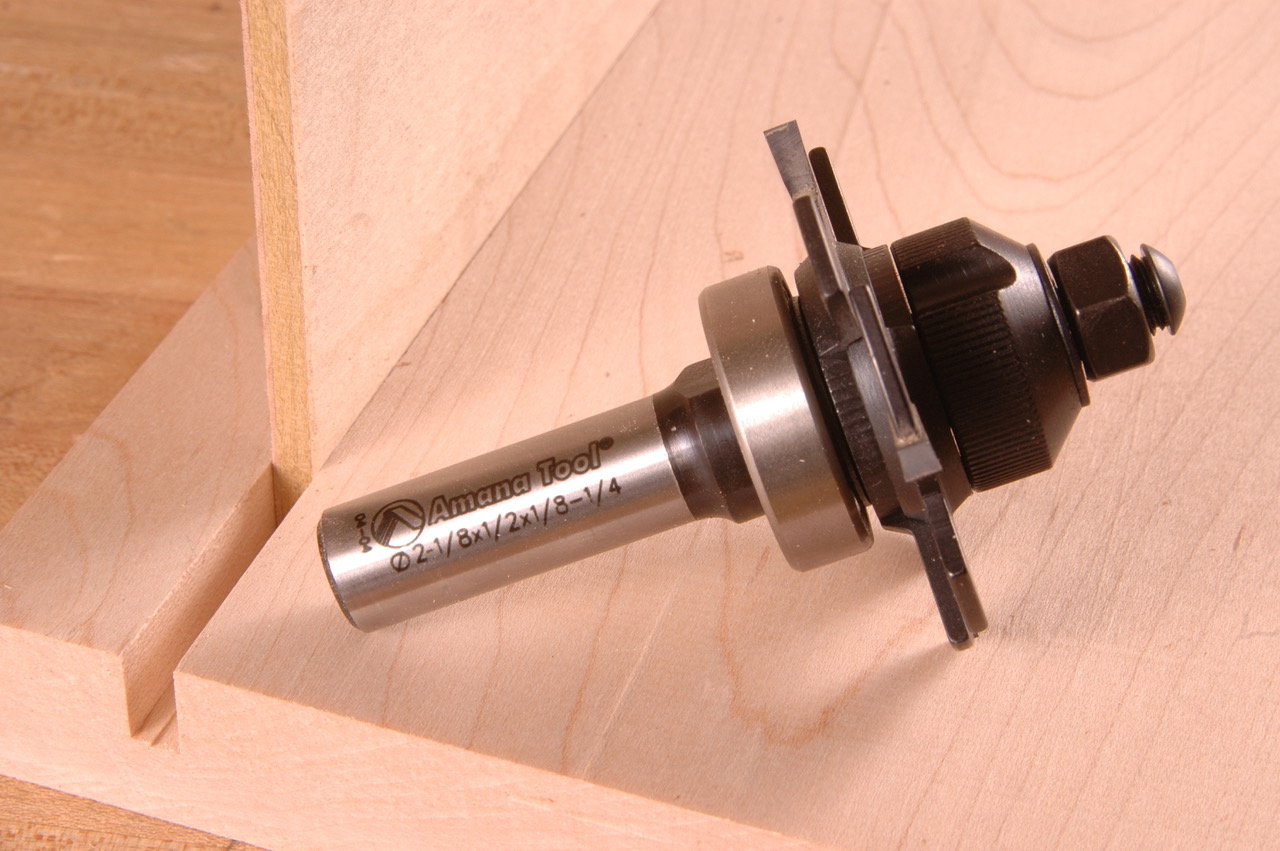
You might ask “Don’t slotting and straight bits do the same thing?” Yes, but each does it differently. Slotting bits cut parallel to the router base; straight bits cut perpendicular to the router base. For example, if you’re cutting a groove in an arched door rail to accept the curved panel, you’ll need a slotting bit with a guide bearing. A straight bit won’t work for this application and a slotting bit won’t reach to cut the dadoes to accept shelves in a bookcase. You’ll need a straight bit for that.
Slotting and straight bits are some of the most useful router bits a woodworker can own, so it’s important to have an assortment in your bit drawer.
Amana offers a wide variety including the innovative time-saver, the Amana E-Z Dial Slot Cutter in two sizes. Simply twist the dial and cut a myriad of slots with just one bit. Take a look at this bit here.
Joinery bits
These days, you can cut fine joinery with your router and the right bit. Amana offers bits for cutting rabbets, finger joints, box joint, 45 degree lock miter and even the time-honored dovetail.
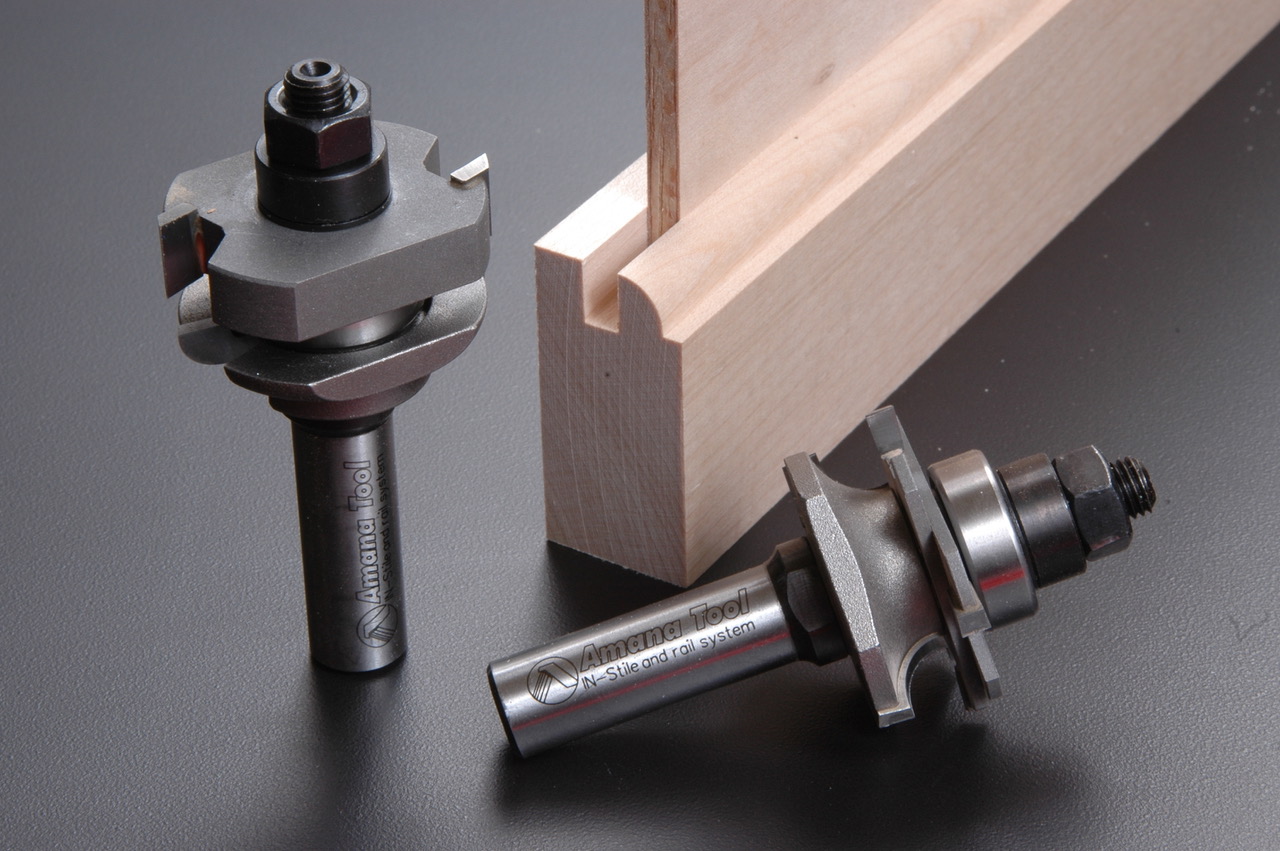
Matched bits
Matched bits come in pairs for cutting mating joints such as tongue-and-groove and stile-and-rail profiles for making cabinets doors. Check out the popular InStile-and-Rail bit sets here. These unique bits adjust for a precise fit with today’s undersized plywood.

Flush Trim and pattern bits
These router bits increase production perhaps more than any other type of bit. At first glance, flush trim bits look like a straight bit. However, a flush trim bit has a guide bearing on the end. Pattern bits have a bearing on the shank. Both designs follow a template or pattern to create a perfect duplicate (PHOTO 4). So whether you’re making two or two hundred of the same item you’ll want one of these versatile bits.
For a super-smooth finish in difficult grain, try a spiral flush trim bit.
CNC Router Bits
Some bits in this catalog are designed specifically for use in Computer Numerical Controlled Routers (CNC) and should not be used in a hand-held or table-mounted router.
Plastic and Aluminum Bits
These bits are specifically designed for use in industries that cut plastic and aluminum.
In-Tech
For the greatest economy, take a look at Amana In-Tech bits here. These bits use solid carbide inserts that hold an edge up to four times longer than brazed bits (PHOTO 5). There is no need to sharpen these bits, just replace the inserts and you’re back in production. Because there is no sharpening of these unique bits, the profile is consistent when the inserts are replaced.
Amana In-Tech bits are available in a variety of decorative profiles as well as bits for flush-trimming and rabbeting.
Using Your Amana Tool Router Bits
Below are a few guidelines that are useful for optimizing your router bits.
- Before turning on the power, plan on how you will guide the cut. Many router bits have a guide bearing on the end which will guide the bit through a curved or straight path of your choosing. However, some bits, such as straights, require a fence or bushing to guide the cut.
- Before mounting a router bit to the router make sure the router is unplugged from power. For proper mounting, clamp the router bit in the router collet by inserting shank up to the right depth, marked clearly by the ‘K’ laser mark.
- Use care to prevent damaging the carbide. When mounting the bit, don’t allow the bit to make contact with the steel collet wrenches or rings in the router table plate. Sudden impact with a hard surface may damage the carbide tips.
- Keep the bit clean and sharp. It’s good practice to periodically clean the residue from the bit surfaces with a commercial tool cleaner. Excessive feed resistance or a rough finish on the workpiece are signs that the bit is dull. Before the bit reaches this point, send it to a reputable grinding shop for sharpening. Periodic sharpening extends the life of the bit because less carbide is removed to restore the edge to sharpness. Never attempt to hone or grind a bit yourself, you will spoil the complex geometry.
- Store your bits properly. Router bits are a woodworking investment that will last for many years with cleaning, sharpening, and proper storage. Never toss bits in a drawer and allow them to come in contact with other router bits or tools.
- Use the proper feed rate. There is no set feed speed when using a router, but with a little practice you’ll know when you’re feeding the router or the workpiece at the optimum speed. Some woodworkers may feed the workpiece too slow out of habit. This causes the bit to overheat and mar the workpiece. The excessive heat also dramatically shortens the life of the carbide. In contrast, feeding too fast may leave a rough, washboard surface. If the router is bogging down it is a usually an indication that it is overloaded from too fast of feed rate. To get an idea of the best feed rate listen to the router, look at the wood surface, and examine the chips or waste produced. When feeding at the optimum speed, the router should be running smooth without strain, the surface of the workpiece should be smooth and free of scorching or discoloration, and the bit should be creating small chips rather than excessive amounts of fine dust.
- Match the router speed to the bit diameter. Most of today’s routers feature variable speed motors. With the click of a switch or the spin of a dial the speed can easily be tuned in to match the bit diameter. Large bits have a higher rim speed than small diameter bits when they are run at the same RPM. Running a large panel raising bit at a high RPM will overheat the bit and the workpiece. In contrast, a 1/4" diameter straight bit will need a higher RPM to cut smoothly.
Routing Safely
Following a few safety guidelines will give you a safe, productive, and enjoyable experience with your router and router bits.
-
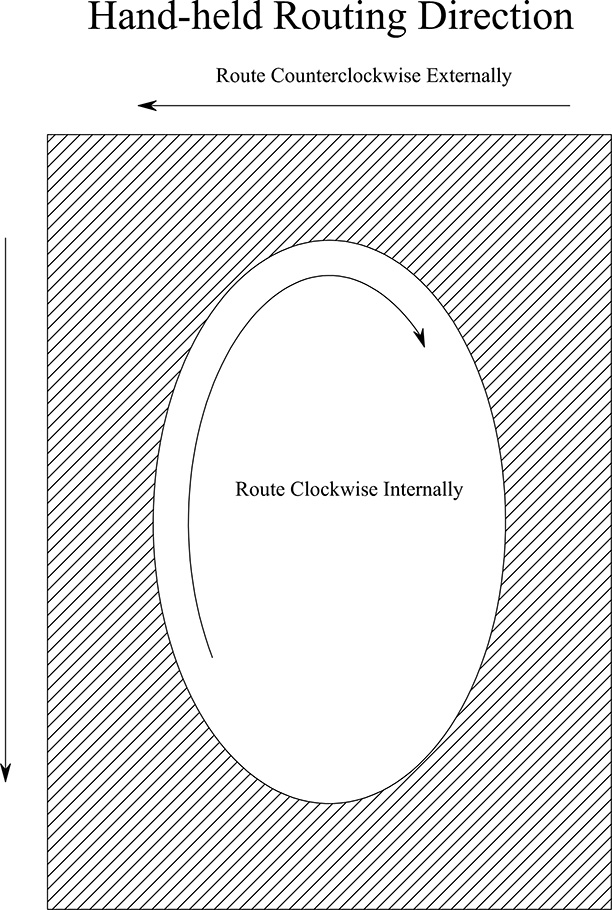 Never climb cut. Always feed against the rotation of the bit. This can sometimes be confusing and the direction depends on whether you’re hand-held routing the perimeter of a workpiece, the interior of a workpiece, or using the router in a table (see drawing). For example:
- When hand-held routing the outer perimeter of a workpiece, such as the edge of a tabletop, push the router in a counter-clockwise direction.
- When hand-held routing the interior of a workpiece, such as an opening or cutout, push the router in a clockwise direction.
- When using a table mounted router, always push the stock from right to left.
- Use eye protection. This is sound advice when using any power tool.
- Use hearing protection. Long-term use of power tools, especially routers, without the use of hearing protection results in hearing loss. Today, it’s easier than ever to find comfortable, lightweight and effective hearing protection.
- Never start the router with the bit in contact with the workpiece. Instead, allow the router to develop full speed before starting the cut.
- Never use a large bit in a hand-held router. Instead, mount the router in a table.
- Don’t attempt to route a small workpiece. For example, if you’re making a strip of narrow trim molding shape a wider board and then rip the molding free. The wider stock adds needed mass and provides greater surface area for grasping the workpiece.
- Don’t cut the power cord. It sounds obvious, but when using a hand-held router keep the cord out of the router path.
- Use push sticks. When using a table mounted router, use push sticks on narrow stock to distance your hands from the spinning bit.
- Use a guard. Mount a guard to the router table fence above the bit. If your router table does not have a guard, purchase an aftermarket guard or make a guard.
- Use Feather boards. When possible use feather boards to help hold material down.
Router Tool Terminology
Cutting Diameter (‘D’) refers to the largest cutting diameter of the tool and is represented in fractions, decimals and/or millimeters.
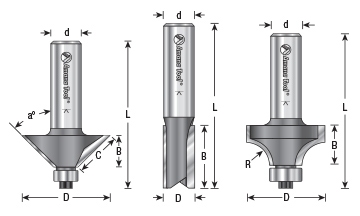
Cutting Length (‘B’ or ‘C’) refers to the length or ‘depth’ of the cutting edge. This dimension usually represents the cutting edge/length parallel to the length of the shank. Represented in fractions and/or millimeters.
Shank Diameter (‘d’) refers to the largest diameter of the shank and is equivalent to the router collect inside diameter that is necessary to use the tool. This dimension is represented in fractions.
Overall Length (‘L’) refers to the total length of a router bit from the top of the shank to the bottom of the tool at its furthestmost point. This dimension is represented in fractions and/or millimeters.
Radius (‘R’) of a cutting tool edge refers to one-half the diameter of a complete circle, and is shown in fractions and/or millimeters.
Beveled Angle (‘aº’) refers to the angle formed between the cutting tool edge and a straight line drawn parallel or perpendicular to the shank length, and is measured in degrees.
Rake Angle (’T’) refers to the angle (or ‘hook’) of the cutting tool tip in relationship to a straight line drawn perpendicular through the center of the tool. This dimension is measured in degrees.
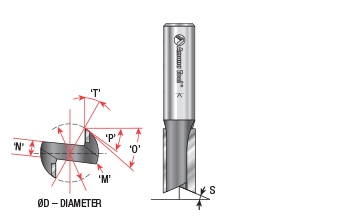
Primary Radial Clearance (‘P’) refers to the relief grind on the tip of the tool and is measured in degrees.
Second Radial Clearance (‘O’) refers to the combined relief grind of the primary clearance and the clearance ground into the body of the tool. This dimension is measured in degrees.
Penetration Clearance (’S’) refers to the angle formed between the cutting tools edge and a straight line drawn perpendicular to the shank of the tool, and is measured in degrees. This angle allows gradual penetration into the material.
Web Diameter (’N’) refers to the thickness of the ground steel body of the tool, including the heel area (’M’). The web must be of adequate thickness to withstand industrial routing applications.